By using filtered data extensions, you can create targeted subsets of your audience based on specific criteria. However, manually updating these segments can be time-consuming and prone to errors. That’s where automation comes in. Automating the filtered data extensions in SFMC ensures your audience segments are always up to date, saving you time and improving the accuracy and efficiency of your marketing campaigns. In this blog, we’ll guide you through setting up and automating filtered data extensions in SFMC so you can focus on crafting personalized and impactful messages for your audience.
What is Filtered Data Extension?
Filtered data extension is a powerful feature in Salesforce Marketing Cloud (SFMC) that allows you to create targeted subsets of your data. These subsets, or “segments,” are created by applying specific criteria to your main data extension.
Think of filtered data extension as a way to sort through your vast customer data to find exactly the people you want to reach for a particular marketing campaign. For example, you might filter your data to find all customers who have purchased in the last 30 days, live in a specific region, or have shown interest in a particular product category.
Here’s a simple breakdown of how filtered data extensions work:
- Source Data Extension: This is your main data set, containing all your customer information.
- Filter Criteria: These are the rules you set to determine which data gets included in your filtered data extension. Filters can be based on any data field, such as location, purchase history, or engagement metrics.
- Filtered Data Extension: This is the new data extension created based on your filter criteria. It contains only the data that meets your specified conditions.
Setting Up Filtered Data Extensions in SFMC:
Creating filtered data extensions in Salesforce Marketing Cloud (SFMC) helps you organize your audience into targeted groups based on specific criteria. Here’s a simple step-by-step guide to setting up filtered data extensions.
1. Accessing Data Extensions:
- Log in to your Salesforce Marketing Cloud account.
- Navigate to the “Email Studio” tab from the main dashboard.
- Hover over Subscribers and click “Data Extensions.” (Refer to Fig.1.1)

Fig.1.1. Accessing Data Extensions in SFMC
2. Creating a New Filtered Data Extension:
- Click the “Create” button to start a new data extension.
- Choose “Filtered Data Extension” from the options. (Refer Fig.1.2)
- Enter a name for your filtered data extension to identify it easily.
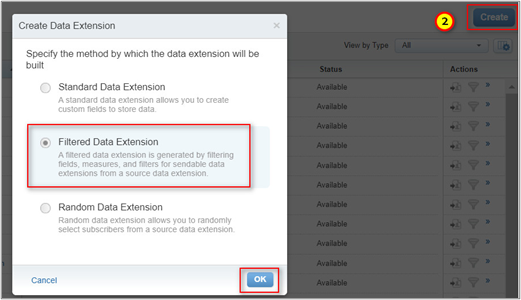
Fig.1.2. Creating New Filtered Data Extension
3. Defining Filter Criteria:
- Select Source Data Extension: Choose the source data extension from which you want to filter data. For example, select “APAC_Market_Source_Data_Extension.” Click OK. (Refer Fig.1.3)
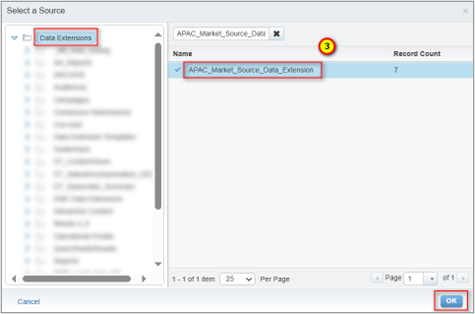
Fig.1.3. Select Source Data Extension
- Set Filter Criteria: Click “Create Filter” and choose the fields and conditions you want to use. For example, you might filter by location, purchase history, or engagement metrics. (Refer Fig.1.4) Combine multiple criteria using AND/OR logic to refine your segment. (Refer Fig.1.5). Click “Save and Build.” (Refer Fig.1.6)

Fig.1.4, 1.5, 1.6. Set Filter Criteria
- Preview Filter Results: You can preview the filtered data to ensure your criteria are set up correctly.
- Save the Data Extension: Review your filter criteria and ensure everything is set up as desired (Refer Fig.1.7, 1.8). Click “Save” to store your new filtered data extension. (Refer Fig.1.9)
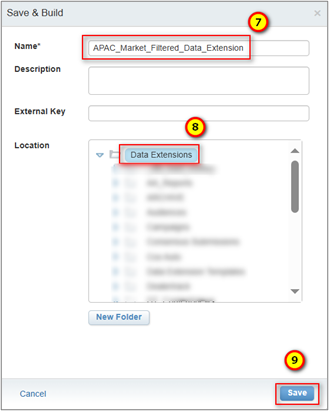
Fig.1.7, 1.8, 1.9. Saving and Deploying the Data Extension
- Deploy the Data Extension: The filtered data extension is now ready for use in your marketing campaigns. You can select it when setting up email sends, reports, or other marketing activities.
Creating Data Filter:
1. Open the filtered data extension “APAC_Market_Filtered_Data_Extension” created above and click “Save As Filter.” (Refer Fig.2.1)
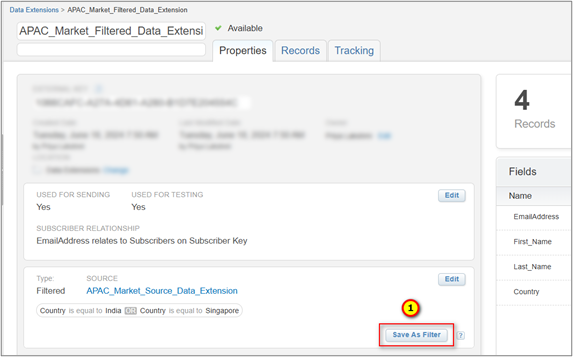
Fig.2.1. Creating Data Filter
2. Enter a name for the data filter. (Refer Fig.2.2)
3. Select a folder to store the data filter. (Refer Fig.2.3)
4. Save it. (Refer Fig.2.4)
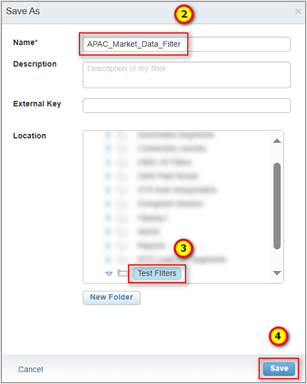
Fig.2.2, 2.3, 2.4. Creating Data Filter
Creating Filtered Activity in Automation Studio:
1. Go to Automation Studio & click the “Activities” tab. (Refer Fig.3.1)
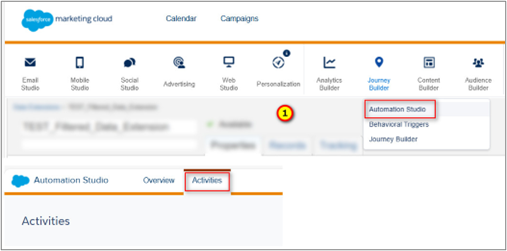
Fig.3.1. Creating Filtered Activity in Automation Studio
2. Click on “Create Activity”. (Refer Fig.3.2)
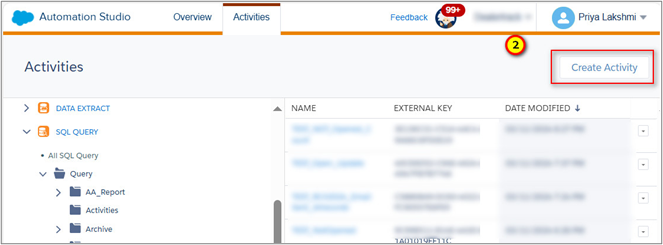
Fig.3.2. Create Activity
3. Select “Filter” activity. (Refer Fig.3.3)
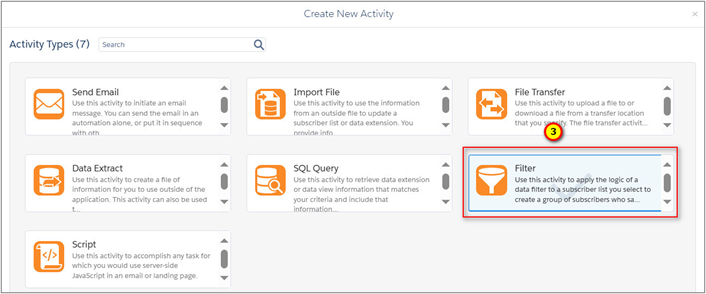
Fig.3.3. Filter Activity
4. Enter a name for the filter activity “APAC_Market_Filter_Activity.” (Refer Fig.3.4)
5. Select the data filter created, “APAC_Market_Data_Filter,” and click Next. (Refer Fig.3.5)

Fig.3.4, 3.5. Naming Filter Activity
6. Enter the name for the resulting filtered data extension to be created and click next. (Refer Fig.3.6)
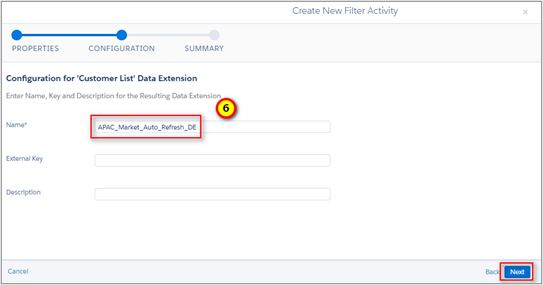
Fig.3.6. Naming Resulting Data Extension
7. Check the overall filter activity details here and click “Finish.” (Refer Fig.3.7)
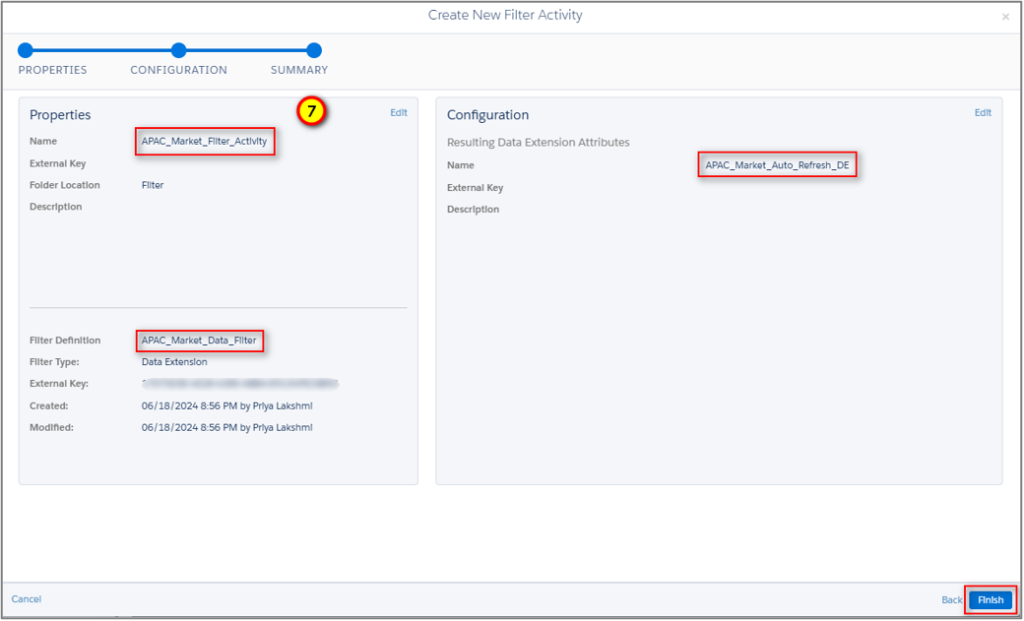
Fig.3.7. Overall Filter Activity Details
Automating Filtered Data Extensions:
Automating filtered data extensions in Salesforce Marketing Cloud (SFMC) can save you time and ensure your data segments are always up to date. Here’s a simple step-by-step guide to help you set up and automate this process using Automation Studio.
Step-by-Step Guide to Automating Filtered Data Extensions:
In the SFMC account, navigate to the “Automation Studio” tab from the main dashboard.
1. Click “Create New Automation” to build your automation workflow. (Refer Fig.4.1)

Fig.4.1. Create New Automation
2. Give your automation a descriptive name to easily identify it later. For example, “APAC_Market_Auto_Refresh.” (Refer Fig.4.2)
3. Drag & drop the filter from the activities section in the left column. (Refer Fig.4.3)
4. Choose the filter activity created, click done, and save the automation. (Refer Fig.4.4)
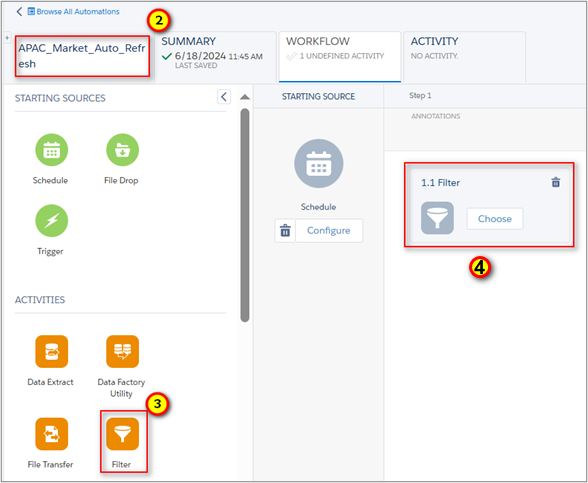
Fig.4.2, 4.3, 4.4. Naming Automation and Choosing Filter
5. Schedule the automation to run. (Hourly, Daily, Weekly, Monthly, Yearly) (Refer Fig.4.5)
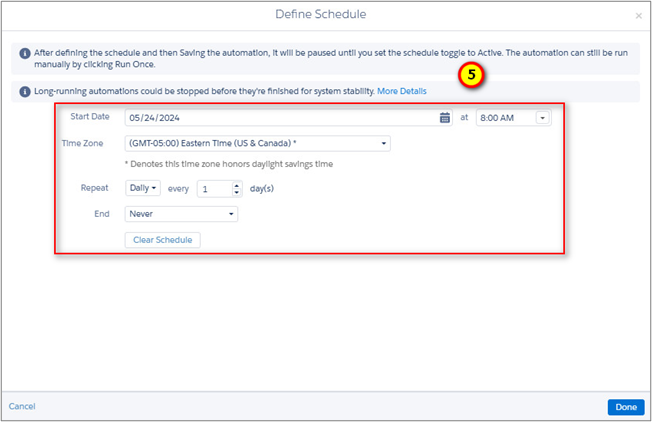
Fig.4.5. Define Schedule
Records updating in the Automated filtered data extension:
Automated filtered data extension “APAC_Market_Auto_Refresh_DE” is created under the Data Extension folder mentioned in the filter activity. (Refer Fig.3.6)
Before Automation:
- The record count in the automated filtered data extension “APAC_Market_Auto_Refresh_DE” is not updated. (Refer Fig.5.1)
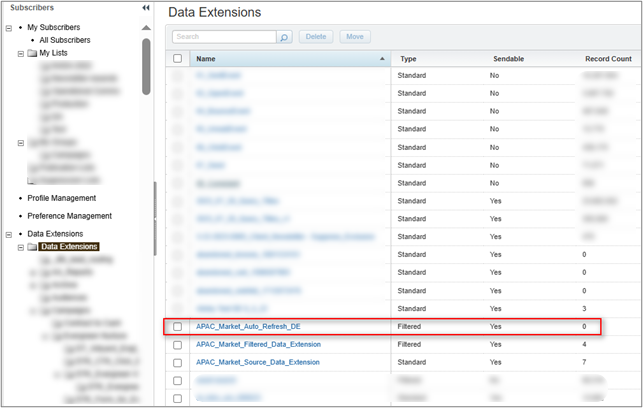
Fig.5.1. Filtered Data Extension – Before Automation
After Automation:
- The filtered data extension is updated based on the filters selected. (Refer Fig.5.2)
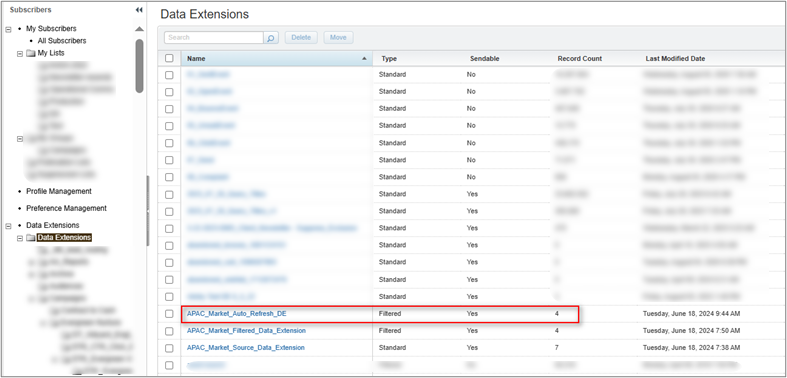
Fig.5.2. Filtered Data Extension – After Automation
- The automation rule runs at the scheduled time, and the record count is updated. (Refer Fig.5.3)
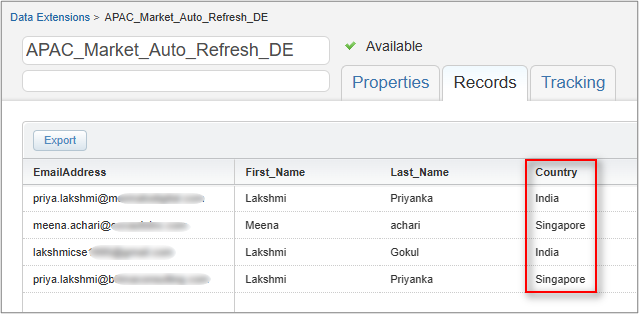
Fig.5.3. Updated Filtered Data Extension
Benefits of Automating Filtered Data Extensions:
Automating filtered data extensions in Salesforce Marketing Cloud (SFMC) offers numerous advantages for your marketing efforts. Here are some key benefits:
a. Ensures Up-to-Date Segments:
- Benefit: Automation keeps your data segments current by regularly updating them based on your defined criteria.
- Why It Matters: Ensures you always have the latest information, leading to more relevant and timely marketing campaigns.
b. Increases Efficiency:
- Benefit: Automating data segmentation streamlines the process, saving you time and resources.
- Why It Matters: Allows your team to focus on strategic activities rather than repetitive tasks.
c. Reduces Manual Effort:
- Benefit: Eliminates the need for manual updates and reduces the risk of human error.
- Why It Matters: Ensures consistency and accuracy in your data, leading to better decision-making and fewer mistakes.
d. Enhances Campaign Performance:
- Benefit: You can deliver more targeted and personalized campaigns with up-to-date and accurate segments.
- Why It Matters: Increases engagement rates, improves customer experiences and boosts overall campaign success.
e. Improves Data Accuracy and Consistency:
- Benefit: Automated processes maintain data integrity by applying filters consistently every time.
- Why It Matters: Reliable data leads to more effective marketing strategies and better outcomes.
Conclusion:
Automating your filtered data extensions in SFMC not only streamlines your workflow but also enhances the effectiveness of your marketing campaigns, making it a smart investment for any data-driven marketing team. By doing so, you’ll save valuable time and ensure your marketing campaigns are always optimized with the latest data.
Avoid Manual Data Segmentation with SFMC Automation!
In the ever-evolving world of digital marketing, automation is crucial for staying competitive. By leveraging the power of SFMC’s automation tools, you can deliver more personalized and effective campaigns, ultimately driving greater success for your business. Start automating today and experience the transformative impact on your marketing efforts.
Marmato Digital can help you automate all your marketing activities and reduce the amount of manual work you do. Our expert team will help you automate your data segmentation to save time, reduce errors, and ensure your campaigns are always targeted and relevant. Don’t miss out on the opportunity to streamline your workflow and enhance your marketing performance. Contact us today! Let’s transform your marketing efforts together!
Subscribe to Newsletter
Get our latest blogs directly to your inbox.